iOS Tap Page Controller 사용방법

|

개인공부 후 자료를 남기기 위한 목적임으로 내용 상에 오류가 있을 수 있습니다.


Tap Page Controller

정리중입니다.

import UIKit
import SnapKit

enum ProjectType {
    case Coupon
    case Identifier
    case Resister
}

class MainVC: UIViewController, MainVCDelegate {

    @IBOutlet weak var containerView: UIView!

    var tableType: ProjectType = .Coupon

    weak var tabPageViewController: TabPageViewController!

    var couponView = MainTableVC.instance()
    var identifierView = MainTableVC.instance()
    var resisterView = MainTableVC.instance()

    var couponList = Array<ModelProject>()
    var identifierList = Array<ModelProject>()
    var resisterList = Array<ModelProject>()


    override func viewDidLoad() {
        super.viewDidLoad()

        tabPageViewController = TabPageViewController.create()

        couponView.tabHeight = tabPageViewController.option.tabHeight
        couponView.delegate = self
        couponView.projectType = .Coupon

        identifierView.tabHeight = tabPageViewController.option.tabHeight
        identifierView.delegate = self
        identifierView.projectType = .Identifier

        resisterView.tabHeight = tabPageViewController.option.tabHeight
        resisterView.delegate = self
        resisterView.projectType = .Resister

        tabPageViewController.tabItems = [(couponView, "쿠폰번호"), (identifierView, "아이디등록"), (resisterView, "쿠폰등록")]

        tabPageViewController.option.fontSize = 14
        tabPageViewController.option.tabHeight = 38
        tabPageViewController.option.currentColor = UIColor.black
//        tabPageViewController.option.defaultColor = UIColor(named: "DDDDDD")!
        tabPageViewController.option.defaultColor = UIColor.gray
        tabPageViewController.option.currentBarHeight = 3

        self.view.addSubview(tabPageViewController.view)
        self.addChild(tabPageViewController)
        self.containerView.addSubview(tabPageViewController.view)
        tabPageViewController.view.snp.makeConstraints {(make) in
            make.top.bottom.leading.trailing.equalTo(self.containerView)
        }

        tabPageViewController.didMove(toParent: self)
    }
}

iOS xcode에서 다크 혹은 라이트모드 지정해주는 방법

|

개인공부 후 자료를 남기기 위한 목적임으로 내용 상에 오류가 있을 수 있습니다.


Xcode에서 모드 지정해주기

1. ViewController에서 override

아래 코드처럼 내가 원하는 모드를 지정해주면 된다.

class ViewController: UIViewController {
    override func viewDidLoad() {
        super.viewDidLoad()
        overrideUserInterfaceStyle = .light     //라이트모드
        //overrideUserInterfaceStyle = .dark    //다크모드
    }
}

2. Info.plist 에서 지정해주기

Add Row > Appearance > Dark or Light 로 지정

String Emoji를 Image로 변환하기(UIGraphicsImage)

|

개인공부 후 자료를 남기기 위한 목적임으로 내용 상에 오류가 있을 수 있습니다.


해야할 문제

프로젝트를 하는 도중 emoji를 imageView에 랜덤으로 받아줘야하는 테스크를 받았다.
여러 emoji를 스트링값으로 배열을 받아 랜덤 처리하는 방식은 생각해냈지만, 이를 이미지로 그려주는 함수를 애플에서 제공해주는지는 몰랐다.

  1. String타입의 이모지를 Image 타입으로 전환
  2. 버튼을 누르면 해당 이미지를 랜덤으로 ImageView에 보여주기

extension + string

func emojiToImg() -> UIImage? {
    let size = CGSize(width: 100, height: 100)  // 내가 원하는 이미지 사이즈
    UIGraphicsBeginImageContextWithOptions(size, false, 0)
    UIColor.clear.set()

    let rect = CGRect(origin: .zero, size: size)
    UIRectFill(CGRect(origin: .zero, size: size))
    (self as AnyObject).draw(in: rect, withAttributes: [.font: UIFont.systemFont(ofSize: 100)])
    let image = UIGraphicsGetImageFromCurrentImageContext()
    UIGraphicsEndImageContext()

    return image
}

ViewController

class ViewController: UIViewController {
    var randomImgList = ["🐶", "🙊", "🍔", "🎨", "🎃", "👾", "🏓"]

    @IBAction func touchRandomBtn(_ sender: UIButton) {
    let randomIndex = Int(arc4random_uniform(UInt32(randomImgList.count)))
    imgView.image = "\(randomImgList[randomIndex])".emojiToImg()
  }
}

iOS 레이아웃이 깨졌을때 할 수 있는 방법?!

|

개인공부 후 자료를 남기기 위한 목적임으로 내용 상에 오류가 있을 수 있습니다.


시작해보기

프로젝트를 진행하다보니 앱을 실행시킬때마다 엄청 지저분한 메시지들이 우두두두두 쏟아지는 것을 볼 수 있었다.

[LayoutConstraints] Unable to simultaneously satisfy constraints.
	Probably at least one of the constraints in the following list is one you don't want.
	Try this:
		(1) look at each constraint and try to figure out which you don't expect;
		(2) find the code that added the unwanted constraint or constraints and fix it.
(
    "<NSLayoutConstraint:0x60000012ba20 UIView:0x7feb9bc4e7c0.width == 335   (active)>",
    "<NSLayoutConstraint:0x60000012be30 H:[UIView:0x7feb9bc4e7c0]-(20)-|   (active, names: '|':UITableViewCellContentView:0x7feb9bc1e4e0 )>",
    "<NSLayoutConstraint:0x60000012bd90 H:|-(20)-[UIView:0x7feb9bc4e7c0]   (active, names: '|':UITableViewCellContentView:0x7feb9bc1e4e0 )>",
    "<NSLayoutConstraint:0x60000016c690 'fittingSizeHTarget' UITableViewCellContentView:0x7feb9bc1e4e0.width == 414   (active)>"
)

Will attempt to recover by breaking constraint
<NSLayoutConstraint:0x60000012ba20 UIView:0x7feb9bc4e7c0.width == 335   (active)>

Make a symbolic breakpoint at UIViewAlertForUnsatisfiableConstraints to catch this in the debugger.

말 그대로 레이아웃이 꺠졌다는 의미이다.
막상 앱을 실행시켰을때는 에러도 없고, 눈에 보이는 레이아웃에는 문제가 없어보이지만 실제로는 고쳐야할 요소가 있다는 의미이다.

레이아웃을 쉽게 고치는 방법에 대해서 알아봅시다.

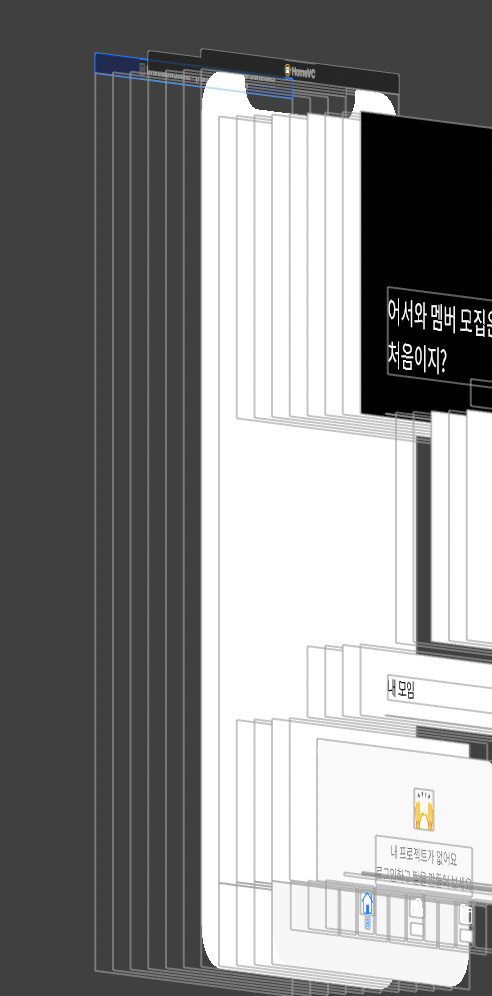
1. view Hierarchy 를 캡쳐

여기서 맨 마지막 아이콘을 누르게 되면 스토리보드의 화면이 아래와 같이 변한다.

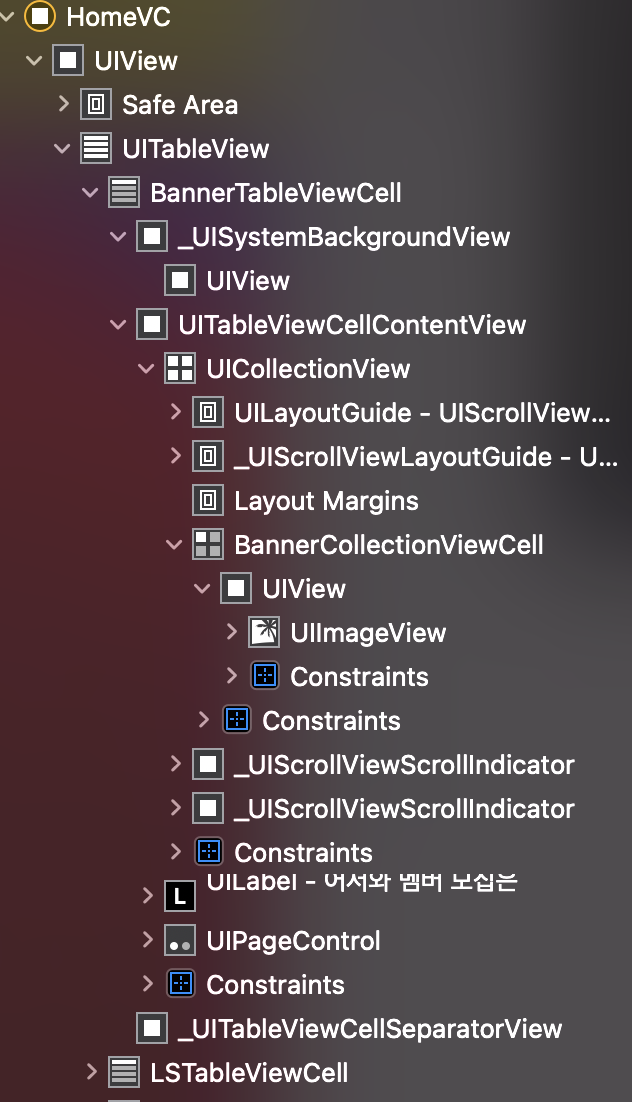
보다 정교하게 UI를 분석할 수 있으며, 아래 네비게이터를 보면 계층구조와 제약조건을 볼 수 있게 된다.
만약 여기서 중복되어 적용된 레이아웃이 있다면 오른쪽에 보라색으로 느낌표가 뜰 것이다.

2. breakPoint 사용

xib나 storyboard같은 UI Builder 사용하여 만들면, 레이아웃이 중복적용되어있거나 빠져있는 경우에 경고를 날려준다. 하지만, 코드로 구성할 때는 이를 알 수 없고 아까 위에서처럼 단순히 메시지만 던져주게 된다.

이때 중점적으로 볼 메시지는 아래와 같다.

Make a symbolic breakpoint at UIViewAlertForUnsatisfiableConstraints to catch this in the debugger.

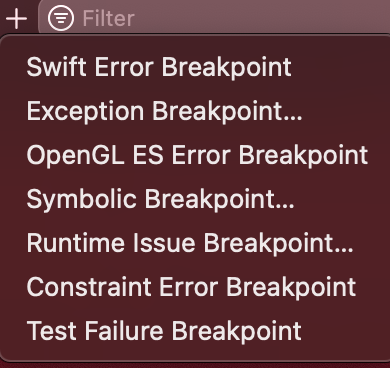
위 아이콘을 클릭해 브레이크포인트를 만들어봅시다. 우리가 만들 브레이크 포인트는 symbolic breakpoint입니다.

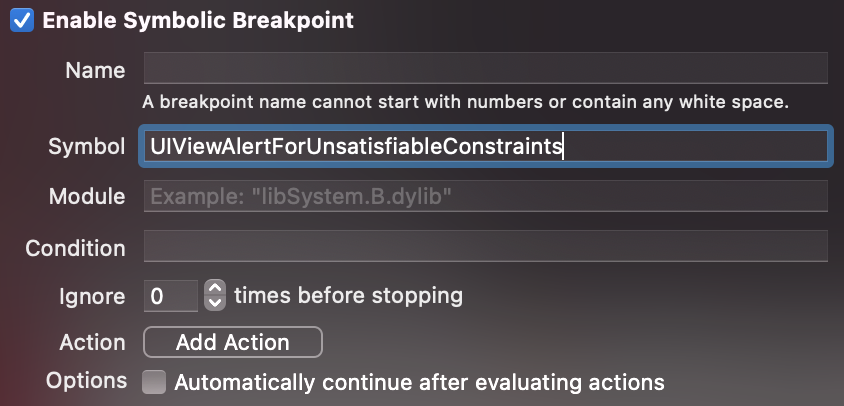
+버튼을 눌러 symbolic breakpoint를 누르고 심볼 부분에 UIViewAlertForUnsatisfiableConstraints를 작성해줍니다.

이후 앱이 깨지는 부분으로 돌아가 고쳐주면 됩니다 :)
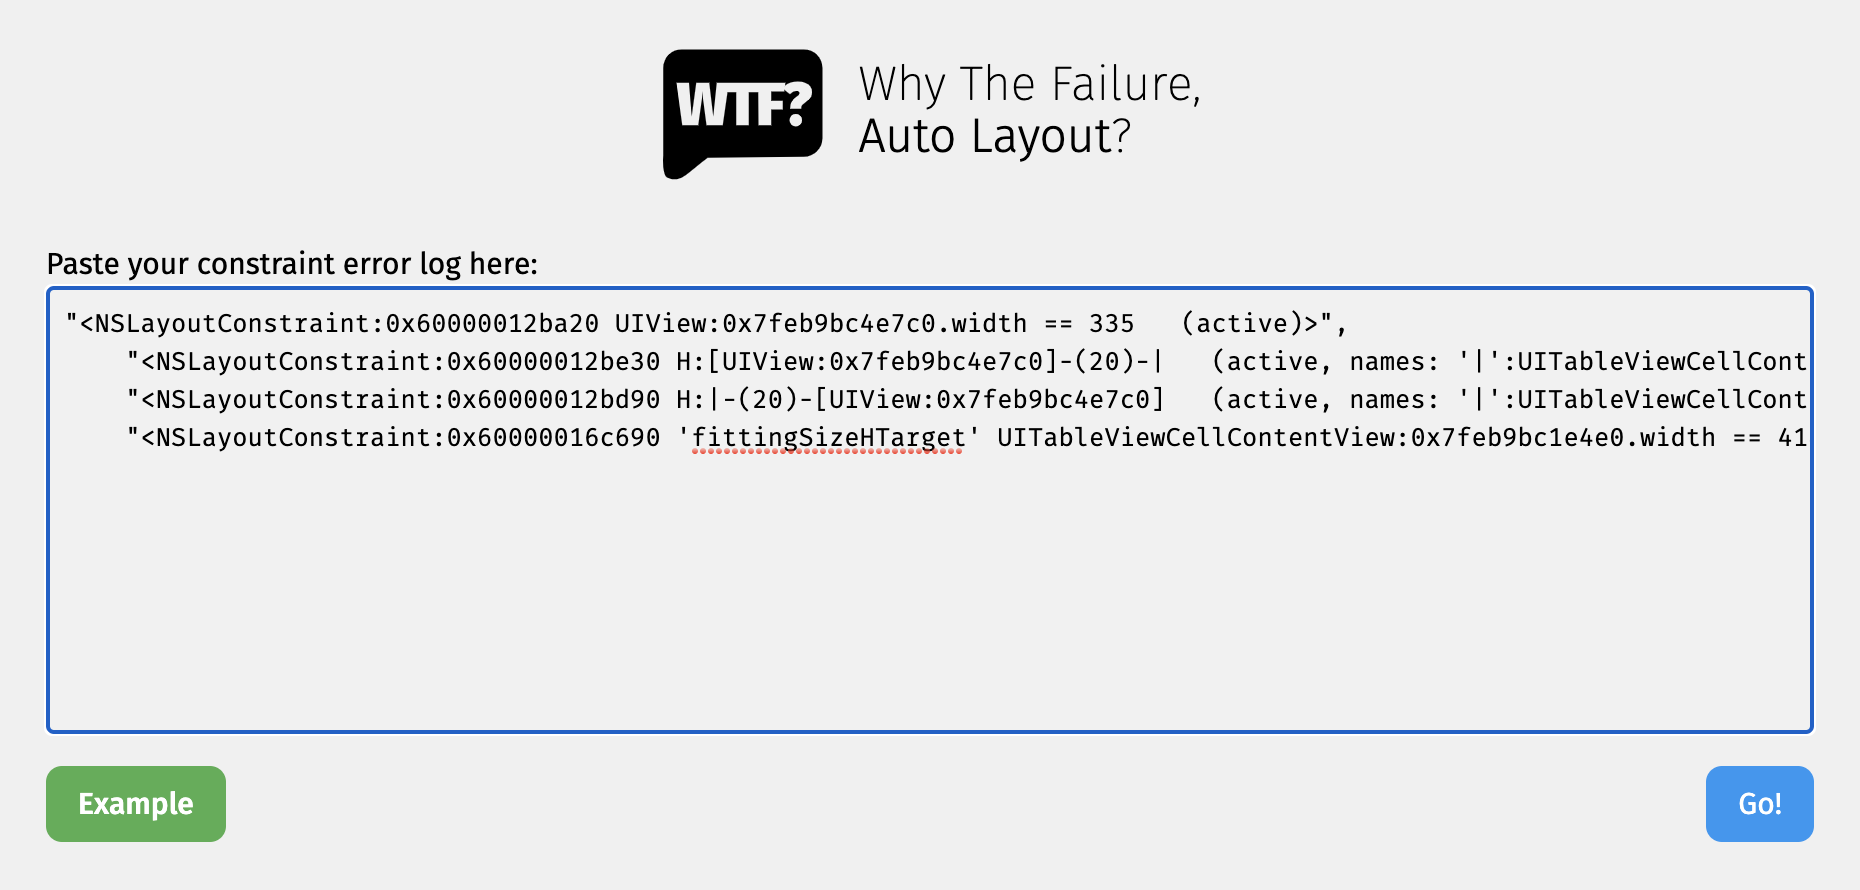
3. WTF Auto Layout

마지막으로는 WTF Auto Layout입니당.

왓더..ㅍ..이 아닌 Why The Failure의 약자로 여기로 들어가보면 바로 실행해볼 수 있다.

위에서 받은 메시지 중 아래를 통해 실행해본다.

"<NSLayoutConstraint:0x60000012ba20 UIView:0x7feb9bc4e7c0.width == 335   (active)>",
"<NSLayoutConstraint:0x60000012be30 H:[UIView:0x7feb9bc4e7c0]-(20)-|   (active, names: '|':UITableViewCellContentView:0x7feb9bc1e4e0 )>",
"<NSLayoutConstraint:0x60000012bd90 H:|-(20)-[UIView:0x7feb9bc4e7c0]   (active, names: '|':UITableViewCellContentView:0x7feb9bc1e4e0 )>",
"<NSLayoutConstraint:0x60000016c690 'fittingSizeHTarget' UITableViewCellContentView:0x7feb9bc1e4e0.width == 414   (active)>"

위 메시지를 고대~로 복사붙이기 해준다.

그러고 GO! 버튼을 눌러주면 내 레이아웃의 문제가 무엇이었는지를 바로 알려준다.

iOS tableviewCell에 광고 넣어보기(Adfit)

|

개인공부 후 자료를 남기기 위한 목적임으로 내용 상에 오류가 있을 수 있습니다.


iOS tableviewCell에 광고 넣어보

이번 프로젝트를 하면서 앱 안에 광고를 넣는 작업을 하게 되었는데, 사용한 방법은 아래와 같습니다.

  1. tableViewCell을 이용
  2. 광고는 카카오에서 제공하는 Adfit을 사용

보여지는 화면 자체를 테이블뷰로 구성하였고 따라서 앱 하단에 들어가는 배너광고 또한 테이블 뷰 셀에 넣는 방식을 사용하였습니다 :)
정확히는 테이블 뷰 셀 위에 uiView를 놓고 그 위에 addSubview를 하는 방식입니다.

ViewController

func tableView(_ tableView: UITableView, cellForRowAt indexPath: IndexPath) -> UITableViewCell {
  let cell = tableView.dequeueReusableCell(withIdentifier: "AdFit") as! AdfitTableViewCell
            let adCellView = cell.setAD(rootVC: self, frame: cell.bounds)
            adCellView.delegate = self
            cell.addSubview(adCellView)

            return cell
}

TableViewCell

func setAD(rootVC: UIViewController, frame: CGRect) -> AdFitBannerAdView {
    let adView = AdFitBannerAdView(clientId: "", adUnitSize: "")
    adView.frame = CGRect(x: 0, y: 0, width: contentView.bounds.width, height: )
    adView.rootViewController = rootVC
    adView.loadAd()

    return adView
}

그런데 잠깐…

혹시 앱을 실행시켰는데 광고가 제대로 된 사이즈로 나오지 않았다면, 셀에 제대로 제약을 걸어주었는지 확인합시다.
uiView를 올리고 해당 뷰에 높이 설정을 제대로 해주었다면 사실 문제없이 광고가 정 사이즈로 나오겠지만, uiView를 띄우지 않고 addSubview를 했다면 셀높이에 대한 제약 조건을 걸어주어야 합니다 :)