이제 데이터를 동적으로도 받아오는 방법을 익혀보았으니, 셀을 커스터마이징을 해보도록 하자!
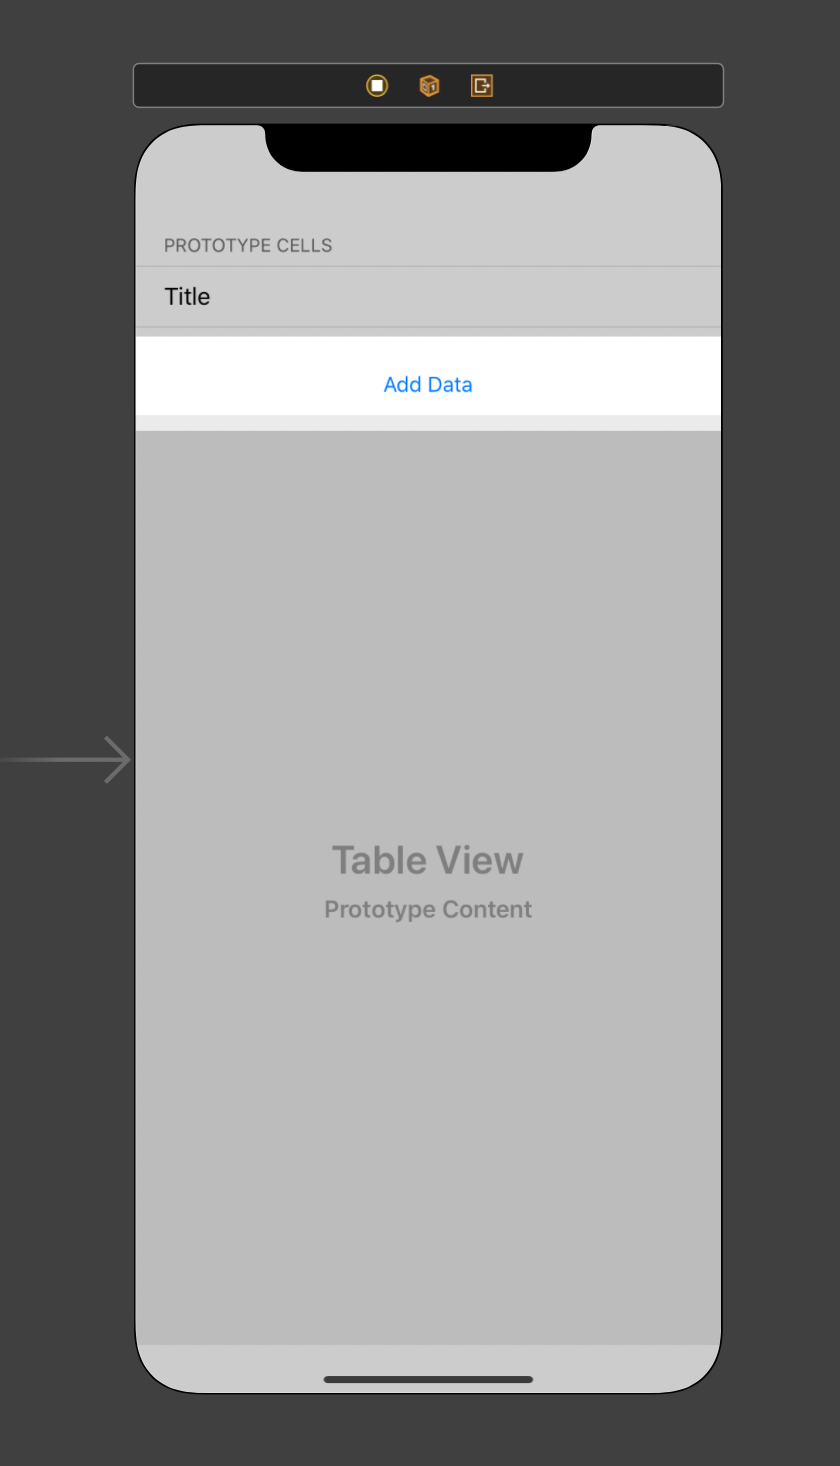
main.storyboard 로 가봅시다.
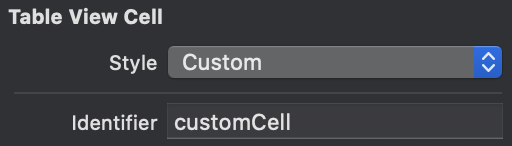
tableViewCell 을 하나 추가해준다.
style: Custom 으로 설정해준다.
Identifier: customCell 로 지정해준다.
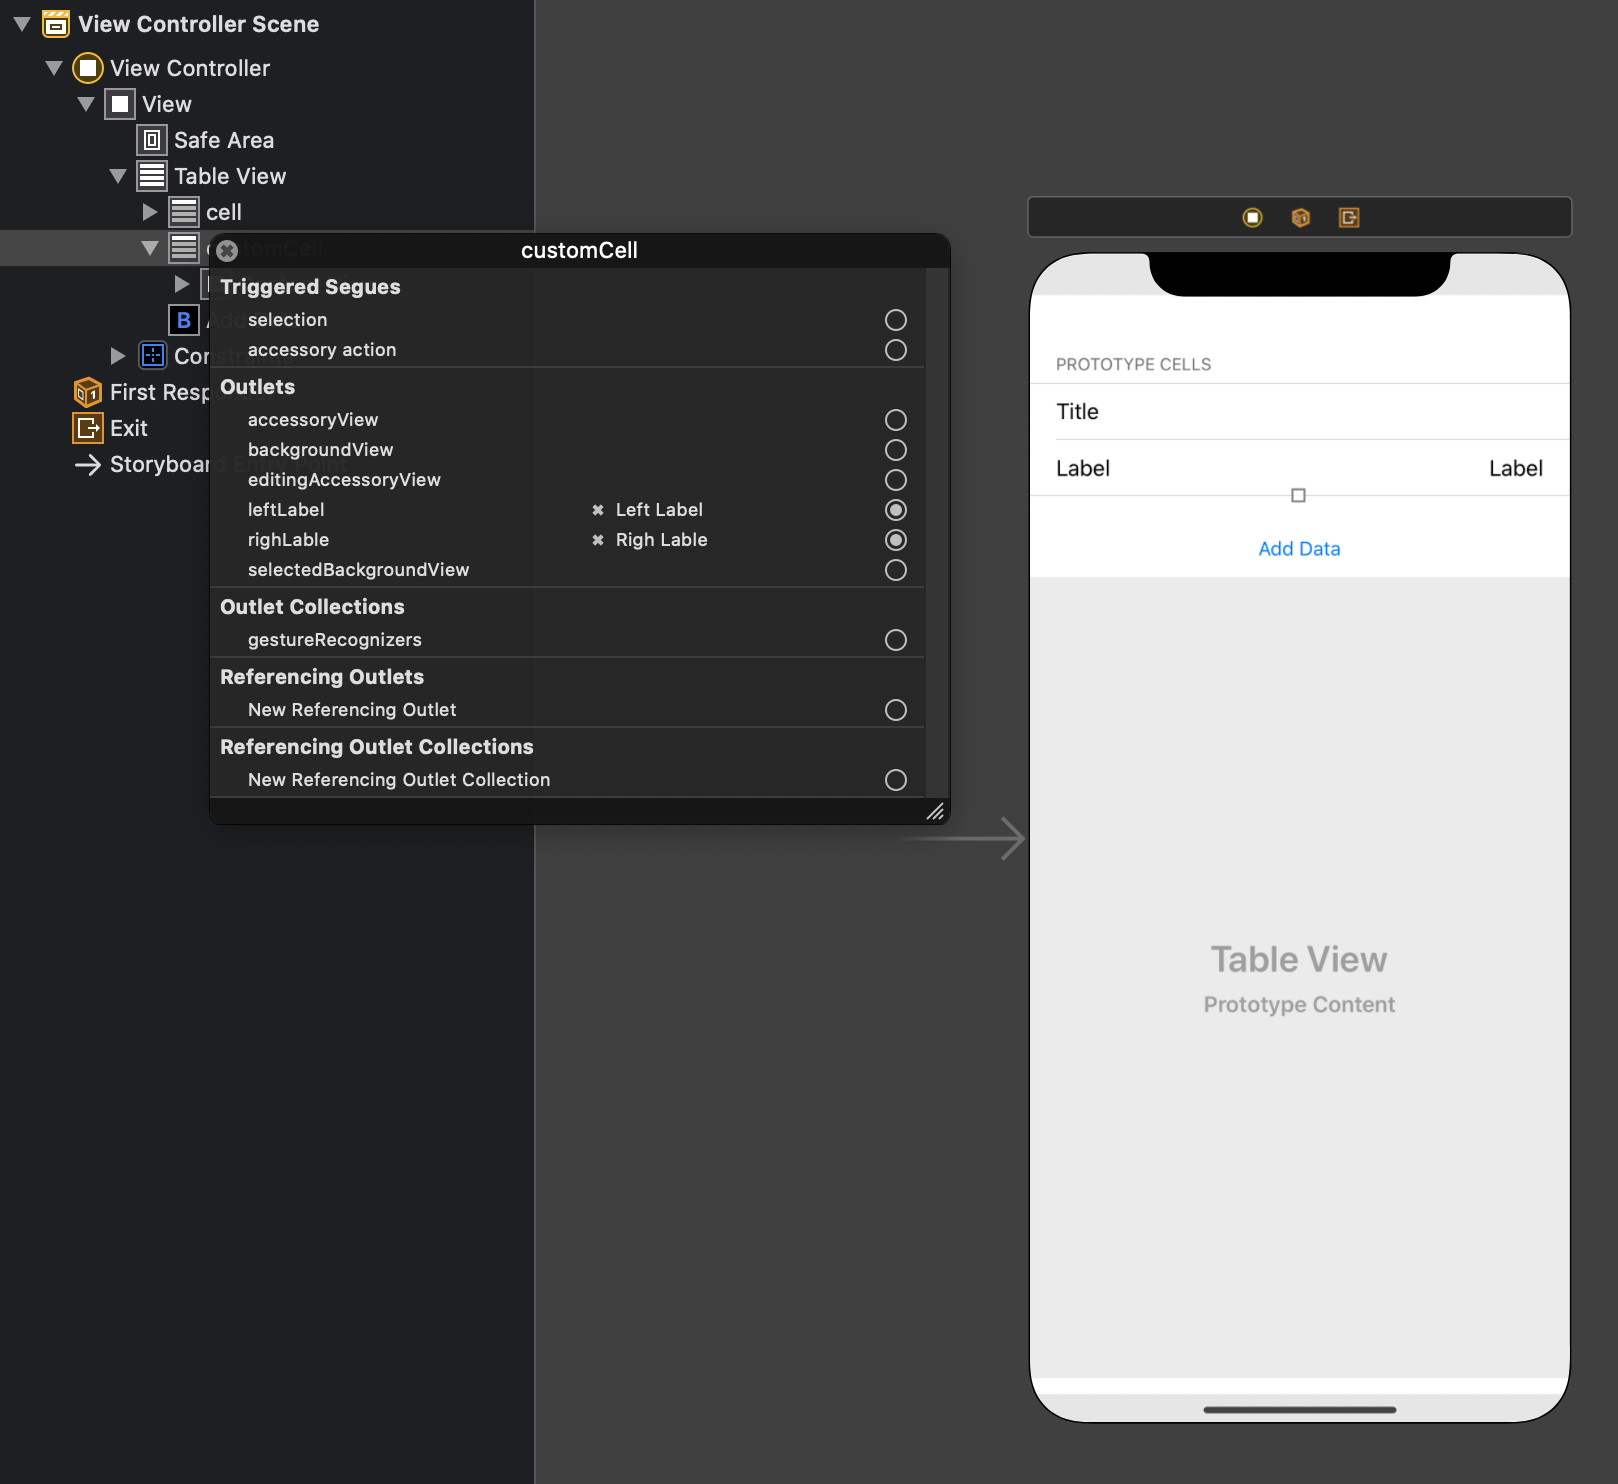
해당 셀 위에 레이블 두개를 추가해준다.
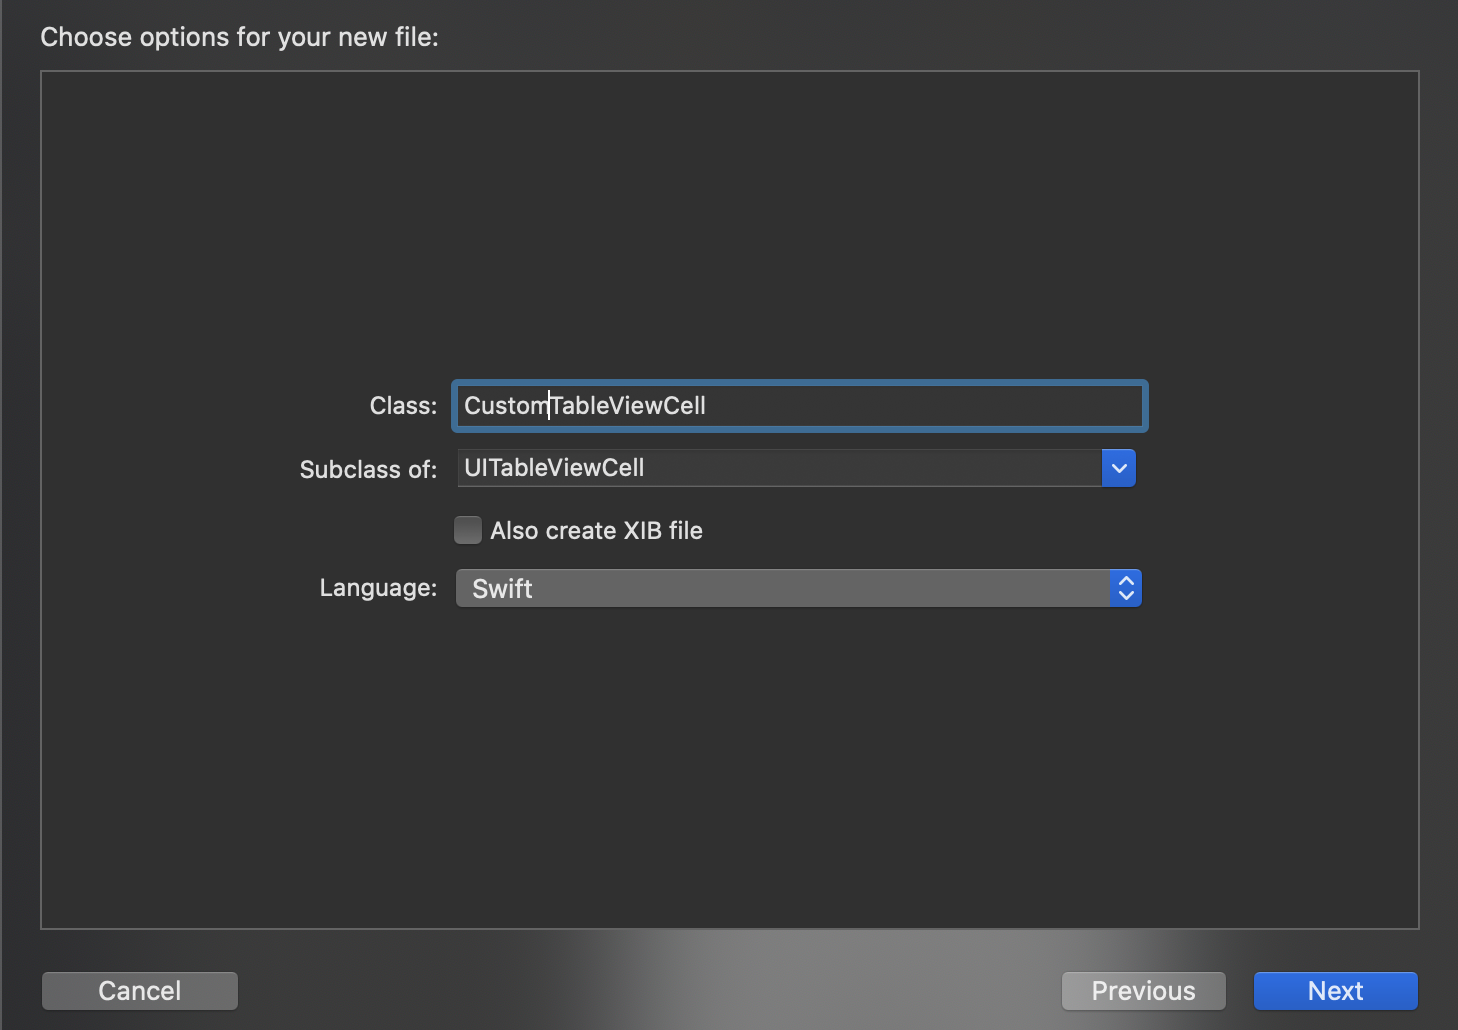
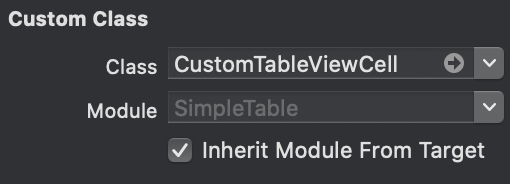
셀의 인스턴스 클래스를 만들기 위해 코코아터치 클래스를 생성해준다.
각각의 레이블이 행할 outlet을 만들어준다.
importUIKitclassCustomTableViewCell:UITableViewCell{@IBOutletvarleftLabel:UILabel!@IBOutletvarrighLable:UILabel!overridefuncawakeFromNib(){super.awakeFromNib()// Initialization code}overridefuncsetSelected(_selected:Bool,animated:Bool){super.setSelected(selected,animated:animated)// Configure the view for the selected state}}
그리고 다시 main.storyboard로 이동합니다. > 각각의 커스텀셀의 인터페이스를 완성해봅시다.
이를 실제로 테이블뷰에서 사용하기 위해서는 viewController로 이동!
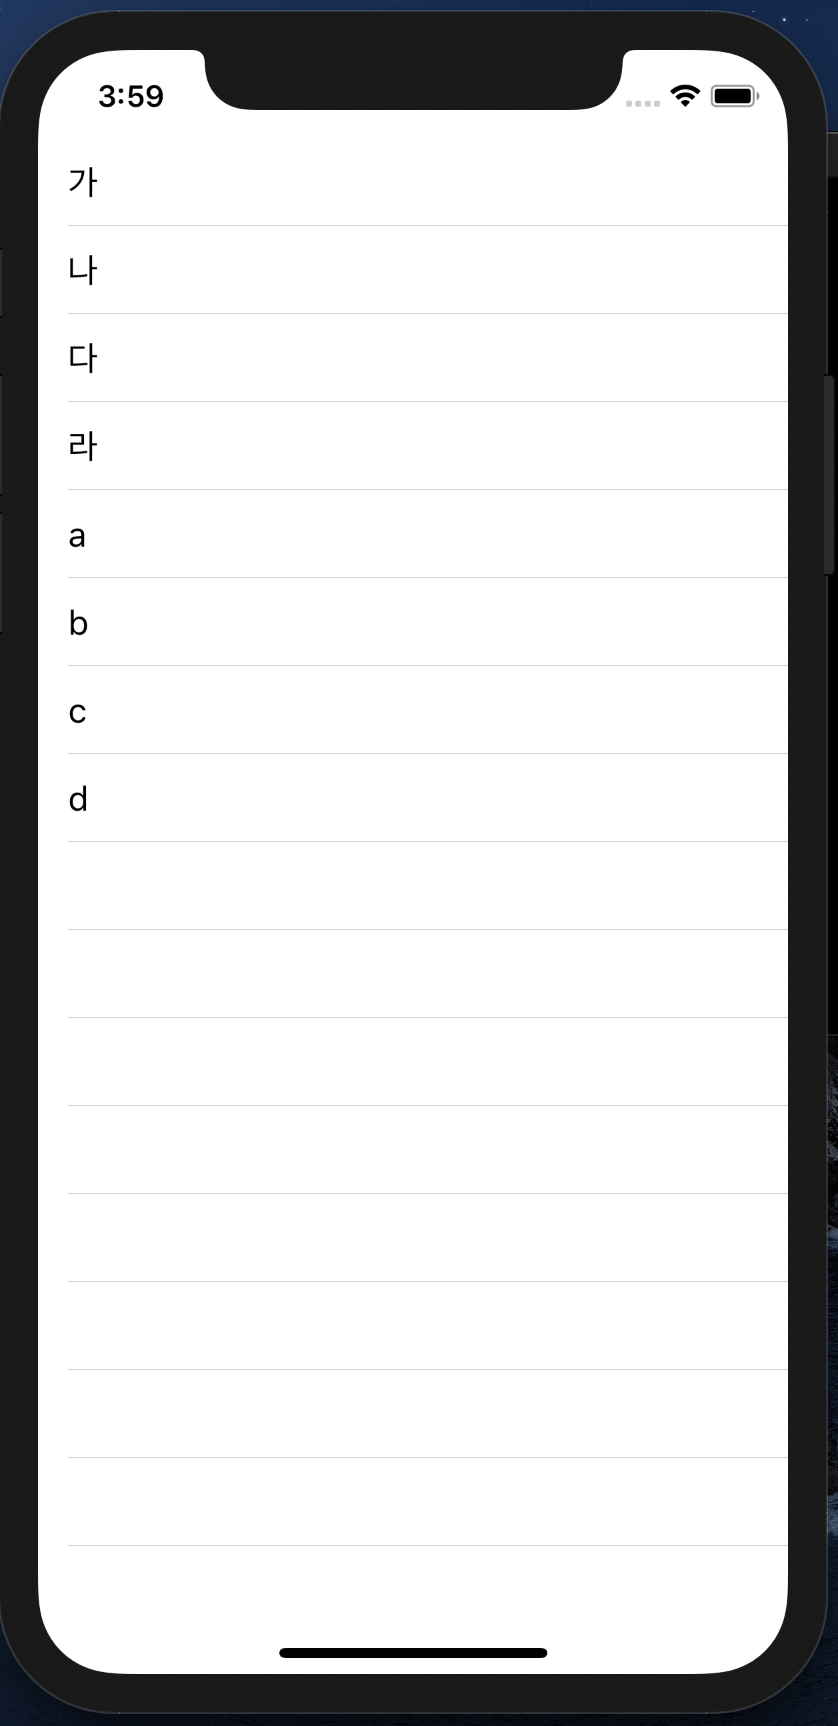
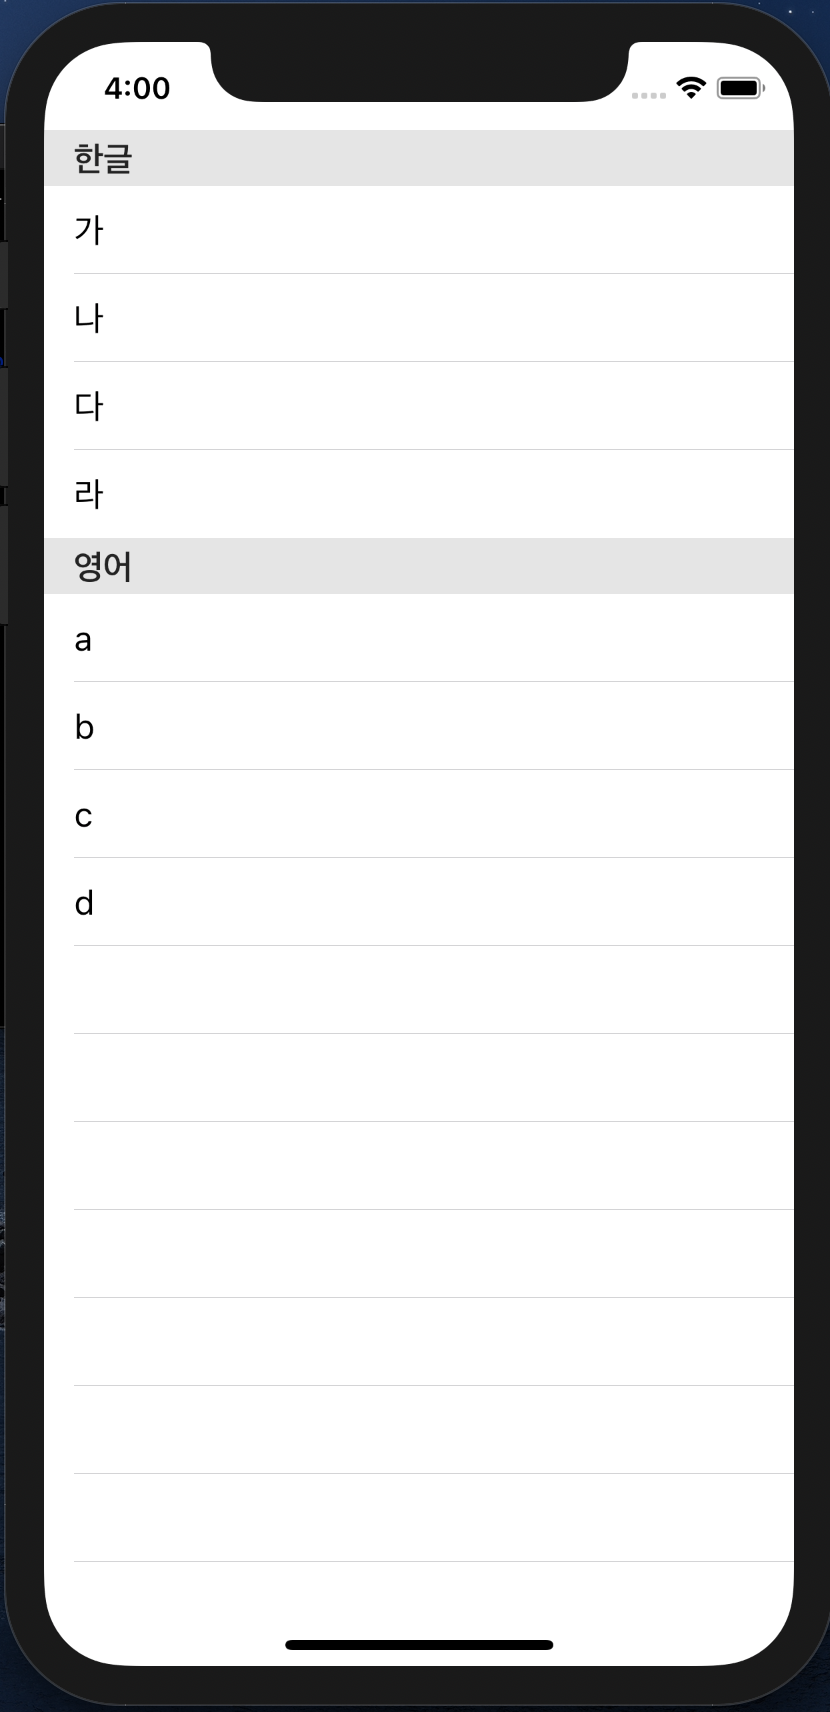
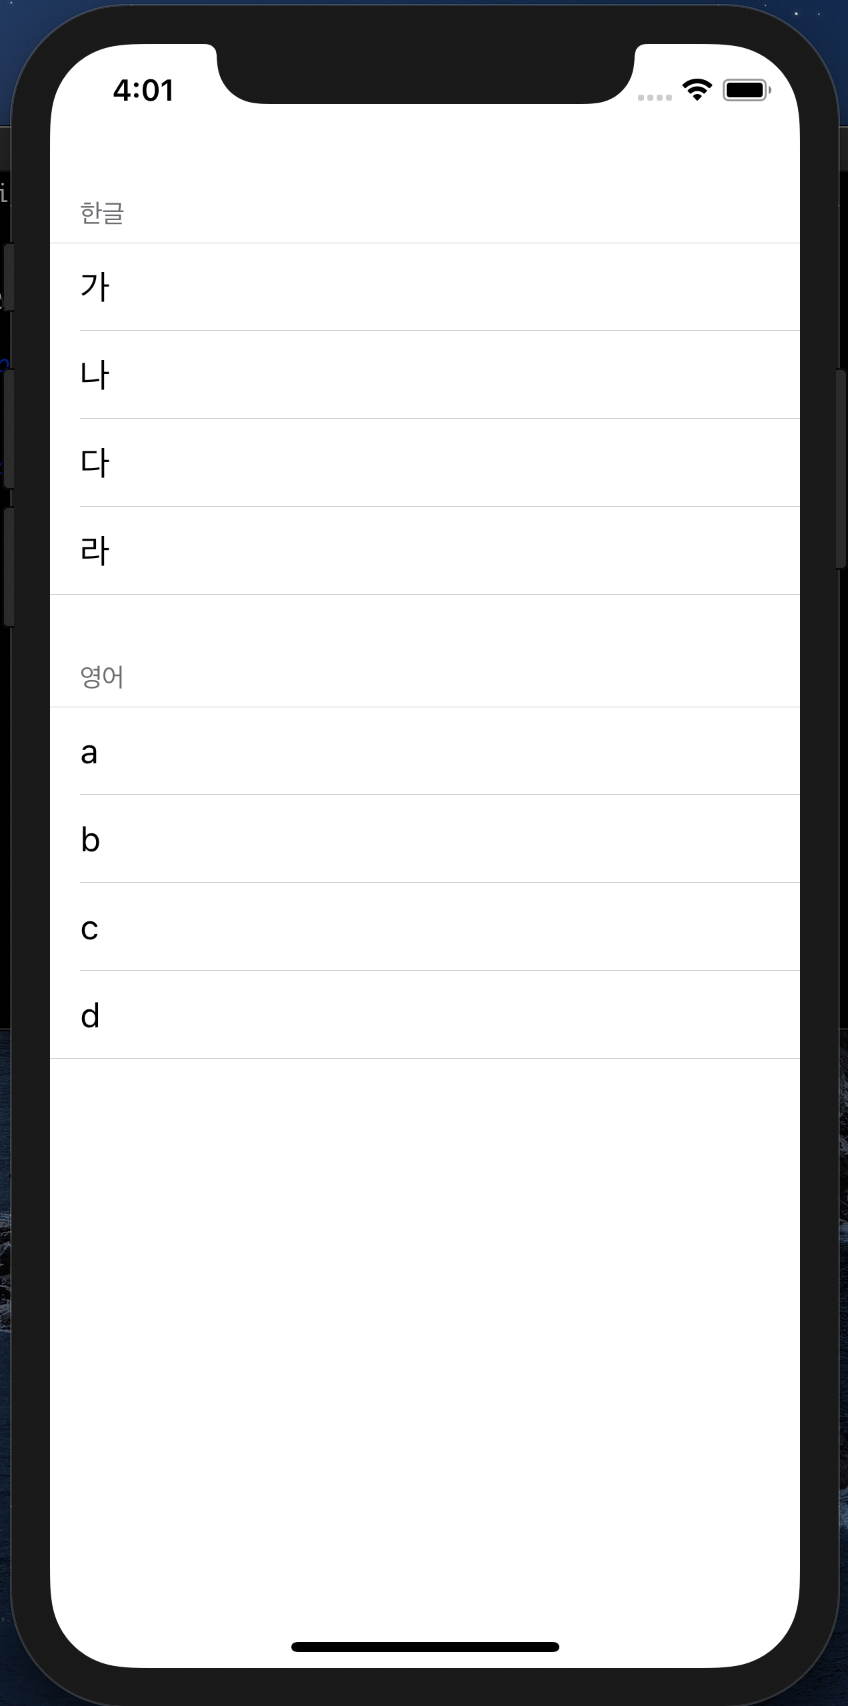
importUIKitclassViewController:UIViewController,UITableViewDelegate,UITableViewDataSource{@IBOutletweakvartableView:UITableView!letcellIdentifier:String="cell"letcustomCellIdentifier:String="customCell"letkorean:[String]=["가","나","다","라"]letenglish:[String]=["a","b","c","d"]vardates:[Date]=[]letdateFormatter:DateFormatter={letformatter:DateFormatter=DateFormatter()formatter.dateStyle=.mediumreturnformatter}()lettimeFormatter:DateFormatter={letformatter:DateFormatter=DateFormatter()formatter.timeStyle=.mediumreturnformatter}()@IBActionfunctouchUpAddBtn(_sender:UIButton){dates.append(Date())// self.tableView.reloadData()self.tableView.reloadSections(IndexSet(2...2),with:UITableView.RowAnimation.automatic)}overridefuncviewDidLoad(){super.viewDidLoad()// Do any additional setup after loading the view.self.tableView.delegate=selfself.tableView.dataSource=self}funcnumberOfSections(intableView:UITableView)->Int{return3}functableView(_tableView:UITableView,numberOfRowsInSectionsection:Int)->Int{switchsection{case0:returnkorean.countcase1:returnenglish.countcase2:returndates.countdefault:return0}}functableView(_tableView:UITableView,cellForRowAtindexPath:IndexPath)->UITableViewCell{ifindexPath.section<2{letcell:UITableViewCell=tableView.dequeueReusableCell(withIdentifier:self.cellIdentifier,for:indexPath)lettext:String=indexPath.section==0?korean[indexPath.row]:english[indexPath.row]cell.textLabel?.text=textreturncell}else{letcell:CustomTableViewCell=tableView.dequeueReusableCell(withIdentifier:self.customCellIdentifier,for:indexPath)as!CustomTableViewCellcell.leftLabel.text=self.dateFormatter.string(from:self.dates[indexPath.row])cell.righLable.text=self.timeFormatter.string(from:self.dates[indexPath.row])returncell}}functableView(_tableView:UITableView,titleForHeaderInSectionsection:Int)->String?{ifsection<2{returnsection==0?"한글":"영어"}returnnil}}
그리고 해당 버튼이 수행할 액션을 코드로 작성한다.
이전에 사용해봤던 dateFormatter를 사용함으로써 버튼을 누르면 날짜가 계속해서 업데이트되어 보여지는 화면을 구성해보자!
vardates:[Date]=[]letdateFormatter:DateFormatter={letformatter:DateFormatter=DateFormatter()formatter.dateStyle=.mediumformatter.timeStyle=.mediumreturnformatter}()@IBActionfunctouchUpAddBtn(_sender:UIButton){dates.append(Date())// self.tableView.reloadData() 해당 섹션의 데이터만 가져오는 것이 아니라 전체 데이터를 다시 불러오게 된다 > 비효율self.tableView.reloadSections(IndexSet(2...2),with:UITableView.RowAnimation.automatic)}
변수 dates를 만들어 빈 array를 만들어준다.
dateFormatter를 사용
해당 액션을 클릭할때마다 array에 데이터가 추가되어진다.
reloadSections를 사용하여 해당 섹션의 데이터만 불러오도록 하고
추가되는 데이터가 애니메이션 효과가 적용된 상태로 보여지도록 한다.
이전 실습에서는 단순 섹션을 추가하고 해당 섹션에 데이터를 추가해줬기 때문에 기존 코드또한 조금 변경을 해줘야 한다.
funcnumberOfSections(intableView:UITableView)->Int{return3// section의 수를 3개로 늘려주고}functableView(_tableView:UITableView,numberOfRowsInSectionsection:Int)->Int{switchsection{case0:returnkorean.countcase1:returnenglish.countcase2:// button section에 해당하는 case를 추가해준다returndates.countdefault:return0}}functableView(_tableView:UITableView,cellForRowAtindexPath:IndexPath)->UITableViewCell{letcell:UITableViewCell=tableView.dequeueReusableCell(withIdentifier:self.cellIdentifier,for:indexPath)ifindexPath.section<2{// section이 2 이하일때 실행하도록 하고lettext:String=indexPath.section==0?korean[indexPath.row]:english[indexPath.row]cell.textLabel?.text=text}else{// 그 외의 case에 대해 실행하는 코드를 추가해준다cell.textLabel?.text=self.dateFormatter.string(from:self.dates[indexPath.row])}returncell}functableView(_tableView:UITableView,titleForHeaderInSectionsection:Int)->String?{ifsection<2{// 해당 코드 또한 section이 2 이하일때 실행되도록 하고returnsection==0?"한글":"영어"}returnnil// 이외에는 nil을 리턴하도록 한다}
즉, 위 코드와 같이 UITableViewDelegate, UITableViewDataSource 프로토콜을 채택한다.
이를 사용하기 위해 스토리보드에서 직접 연결을 할 수도 있다.
그리고 코드로 구현해볼 수도 있다.
overridefuncviewDidLoad(){super.viewDidLoad()// Do any additional setup after loading the view.self.tableView.delegate=selfself.tableView.dataSource=self}
근데 이렇게 채택한 프로토콜을 사용하려하면 아래와 같은 오류가 계속 떠있을 것이다.
UITableViewDataSource가 정의되어 있는 곳으로 들어가보면 publie, optional 등 다양하게 구현되어있는 것을 볼 수 있다.
이때 옵셔널이 아닌것은 꼭 구현이 되어야 한다는 것을 의미한다.
첫번째 함수는 테이블뷰에 섹션에 해당하는 로우가 몇개인지를 알려달라는 메소드로 return을 통해 알려주게 되며 두번째는 로우마다 해당하는 셀을 돌려달라는 메소드이다. 지금 우리는 코드에서 한글섹션과 영어섹션 두개를 나누어서 구성을 해볼 것인데, 이를 구성하는 방법은 무엇일까? > tableView numberOfSection 사용
funcnumberOfSections(intableView:UITableView)->Int{return2// 두개의 섹션을 사용할 것}functableView(_tableView:UITableView,numberOfRowsInSectionsection:Int)->Int{switchsection{// 각 섹션마다 다른 갯수를 돌려줄 것case0:// tableView의 section은 0부터 시작returnkorean.count// 한글 array의 갯수만큼 돌려줌case1:returnenglish.count// 영어 array의 갯수만큼 돌려줌default:return0}}functableView(_tableView:UITableView,cellForRowAtindexPath:IndexPath)->UITableViewCell{letcell:UITableViewCell=tableView.dequeueReusableCell(withIdentifier:self.cellIdentifier,for:indexPath)lettext:String=indexPath.section==0?korean[indexPath.row]:english[indexPath.row]cell.textLabel?.text=text// 셀에 표현될 데이터returncell}
테이블뷰에 원하는 정보를 표시하고, 사용자 선택에 적절히 반응하는 테이블뷰 구현을 위해 꼭 필요한 데이터 소스와 델리게이트에 대해 알아보도록 하자.
테이블뷰 데이터 소스와 델리게이트
UITableView 객체는 데이터 소스와 델리게이트가 없다면 정상적으로 동작하기 어려우므로 두 객체가 꼭 필요하다.
MVC(Model-View-Controller) 프로그래밍 디자인 패턴에 따라 데이터 소스는 애플리케이션의 데이터 모델(M)과 관련되어 있으며, 델리게이트는 테이블뷰의 모양과 동작을 관리하기에 컨트롤러(C)의 역할에 가깝다. 테이블뷰는 뷰(V)의 역할을 합니다. 데이터 소스와 델리게이트를 통해 테이블뷰를 매우 유연하게 만들 수 있다.
데이터 소스
테이블뷰 데이터 소스 객체는 UITableViewDataSource 프로토콜을 채택한다
데이터 소스는 테이블 뷰를 생성하고 수정하는데 필요한 정보를 테이블뷰 객체에 제공
데이터 소스는 데이터 모델의 델리게이트로, 테이블뷰의 시각적 모양에 대한 최소한의 정보를 제공
UITableView 객체에 섹션의 수와 행의 수를 알려주며, 행의 삽입, 삭제 및 재정렬하는 기능을 선택적으로 구현
UITableViewDataSource 프로토콜의 주요 메서드는 아래와 같다. 이 중 @required로 선언된 두 가지 메서드는 UITableViewDataSource 프로토콜을 채택한 타입에 필수로 구현해야 한다
@required// 특정 위치에 표시할 셀을 요청하는 메서드functableView(UITableView,cellForRowAt:IndexPath)// 각 섹션에 표시할 행의 개수를 묻는 메서드functableView(UITableView,numberOfRowsInSection:Int)@optional// 테이블뷰의 총 섹션 개수를 묻는 메서드funcnumberOfSections(in:UITableView)// 특정 섹션의 헤더 혹은 푸터 타이틀을 묻는 메서드functableView(UITableView,titleForHeaderInSection:Int)functableView(UITableView,titleForFooterInSection:Int)// 특정 위치의 행을 삭제 또는 추가 요청하는 메서드functableView(UITableView,commit:UITableViewCellEditingStyle,forRowAt:IndexPath)// 특정 위치의 행이 편집 가능한지 묻는 메서드functableView(UITableView,canEditRowAt:IndexPath)// 특정 위치의 행을 재정렬 할 수 있는지 묻는 메서드functableView(UITableView,canMoveRowAt:IndexPath)// 특정 위치의 행을 다른 위치로 옮기는 메서드functableView(UITableView,moveRowAt:IndexPath,to:IndexPath)
델리게이트
테이블뷰 델리게이트 객체는 UITableViewDelegate 프로토콜을 채택
델리게이트는 테이블뷰의 시각적인 부분 수정, 행의 선택 관리, 액세서리뷰 지원 그리고 테이블뷰의 개별 행 편집을 도와줌
델리게이트 메서드를 활용하면 테이블뷰의 세세한 부분을 조정할 수 있다
UITableViewDelegate 프로토콜의 주요 메서드는 아래와 같으며 이 중 필수로 구현해야 하는 메서드는 없다.
// 특정 위치 행의 높이를 묻는 메서드functableView(UITableView,heightForRowAt:IndexPath)// 특정 위치 행의 들여쓰기 수준을 묻는 메서드functableView(UITableView,indentationLevelForRowAt:IndexPath)// 지정된 행이 선택되었음을 알리는 메서드functableView(UITableView,didSelectRowAt:IndexPath)// 지정된 행의 선택이 해제되었음을 알리는 메서드functableView(UITableView,didDeselectRowAt:IndexPath)// 특정 섹션의 헤더뷰 또는 푸터뷰를 요청하는 메서드functableView(UITableView,viewForHeaderInSection:Int)functableView(UITableView,viewForFooterInSection:Int)// 특정 섹션의 헤더뷰 또는 푸터뷰의 높이를 물어보는 메서드functableView(UITableView,heightForHeaderInSection:Int)functableView(UITableView,heightForFooterInSection:Int)// 테이블뷰가 편집모드에 들어갔음을 알리는 메서드functableView(UITableView,willBeginEditingRowAt:IndexPath)// 테이블뷰가 편집모드에서 빠져나왔음을 알리는 메서드functableView(UITableView,didEndEditingRowAt:IndexPath?)
테이블 뷰는 데이터 표현 만 관리하며 데이터 자체를 관리하지 않는다. 데이터를 관리하기 위해 데이터 소스 오브젝트, 즉 UITableViewDataSource 프로토콜을 구현하는 오브젝트를 테이블에 제공한다. 데이터 소스 개체는 테이블의 데이터 관련 요청에 응답하며, 테이블의 데이터를 직접 관리하거나 앱의 다른 부분과 조정하여 해당 데이터를 관리한다.
테이블의 섹션 및 행 개수를 보고
테이블의 각 행에 셀을 제공
섹션 머리글과 바닥 글에 제목을 제공
// Return the number of rows for the table. overridefunctableView(_tableView:UITableView,numberOfRowsInSectionsection:Int)->Int{return0}// Provide a cell object for each row.overridefunctableView(_tableView:UITableView,cellForRowAtindexPath:IndexPath)->UITableViewCell{// Fetch a cell of the appropriate type.letcell=tableView.dequeueReusableCell(withIdentifier:"cellTypeIdentifier",for:indexPath)// Configure the cell’s contents.cell.textLabel!.text="Cell text"returncell}
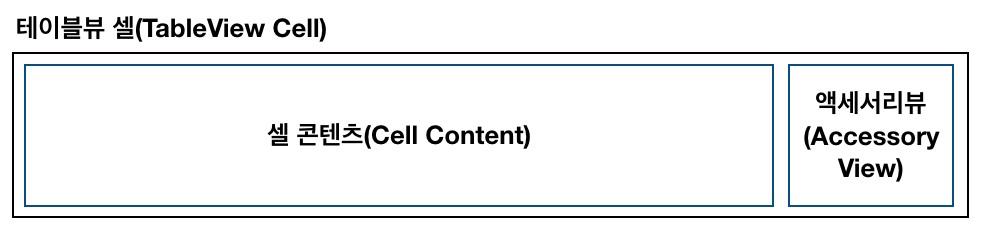
테이블뷰 셀(TableView Cell)은 테이블뷰를 이루는 개별적인 행(row)으로, UITableViewCell 클래스를 상속받는다. UITableViewCell 클래스에 정의된 표준 스타일을 활용해 문자열 혹은 이미지를 제공하는 셀을 생성할 수 있으며, 커스텀 서브뷰를 올려 다양한 시각적 모습을 나타낼 수 있다.
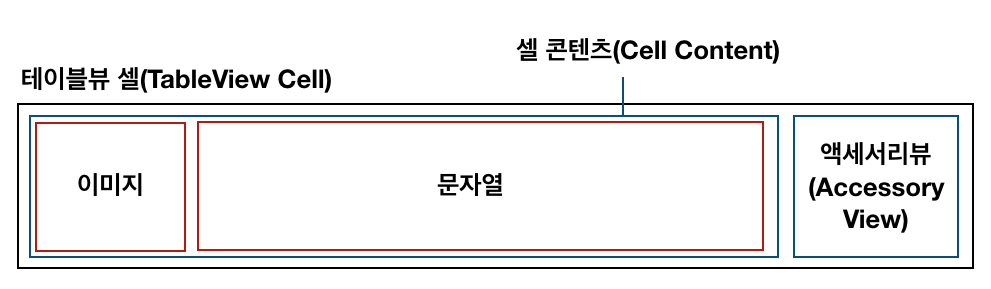
테이블뷰 셀의 구조
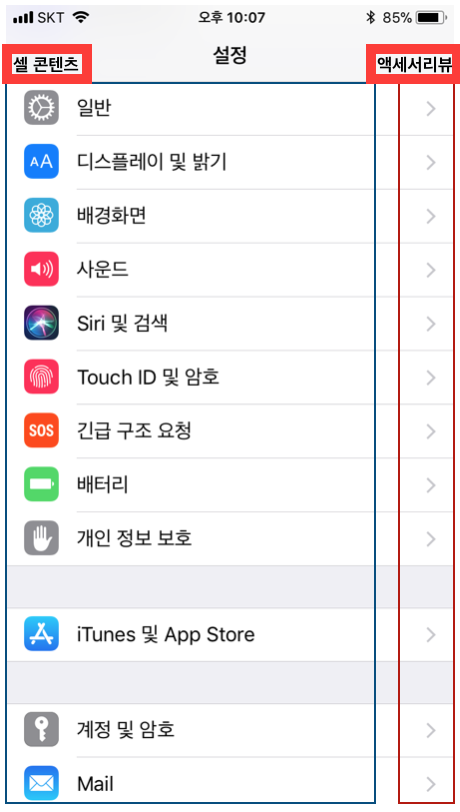
기본적으로 테이블뷰 셀은 아래 이미지와 같이 크게 콘텐츠 영역과 액세서리뷰 영역으로 구조가 나뉩니다.
콘텐츠 영역: 셀의 왼쪽 부분에는 주로 문자열, 이미지 혹은 고유 식별자 등이 입력
액세서리뷰 영역: 셀의 오른쪽 작은 부분은 액세서리뷰로 상세보기, 재정렬, 스위치 등과 같은 컨트롤 객체가 위치
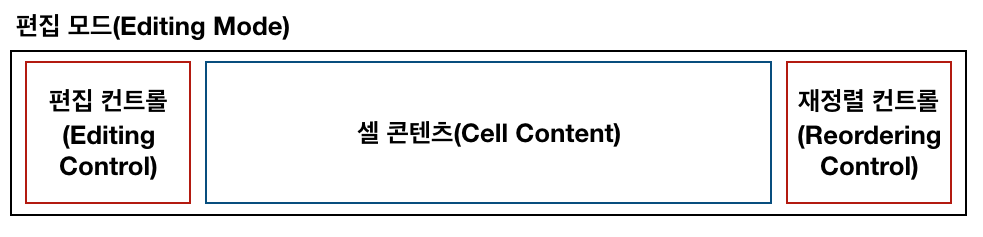
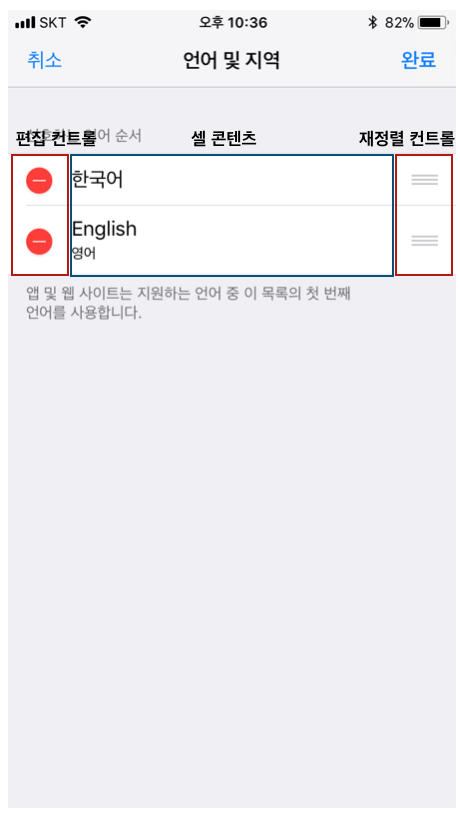
테이블뷰를 편집 모드(Editing Mode)로 전환하면 아래와 같은 구조로 바뀐다
편집 컨트롤은 삭제 컨트롤(빨간 원 안의 마이너스 기호) 또는 추가 컨트롤(녹색 원 안의 플러스 기호) 중 하나가 될 수 있으며 재정렬이 가능한 경우, 재정렬 컨트롤이 액세서리뷰에 나타난다. 재정렬 컨트롤을 눌러 셀을 드래그하면 위아래로 순서를 변경할 수 있다.
테이블뷰 셀의 기본 기능
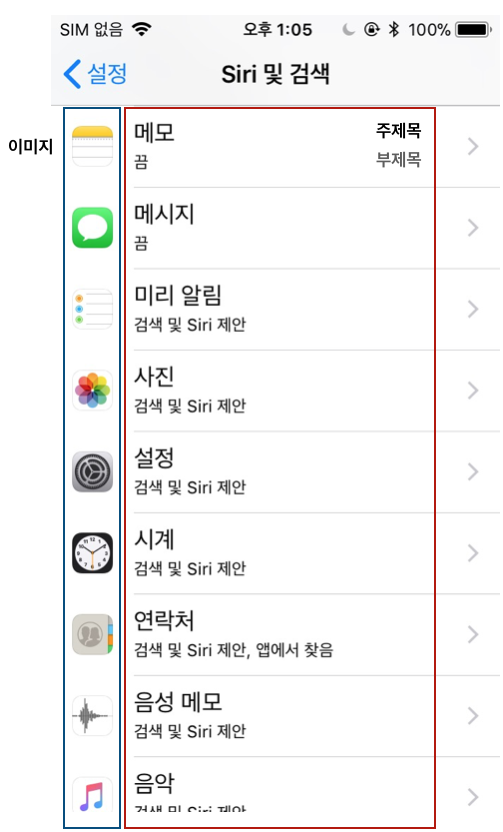
UITableViewCell 클래스를 상속받는 기본 테이블뷰 셀은 표준 스타일을 이용할 수 있다. 표준 스타일의 콘텐츠 영역은 한 개 이상의 문자열 그리고 이미지를 지닐 수 있으며, 이미지가 오른쪽으로 확장됨에 따라 문자열이 오른쪽으로 밀려난다.
UITableViewCell 클래스는 셀 콘텐츠에 세 가지 프로퍼티가 정의되어 있음
textLabel: UILabel: 주제목 레이블
detailTextLabel: UILabel: 추가 세부 사항 표시를 위한 부제목 레이블
imageView: UIImageView: 이미지 표시를 위한 이미지뷰
커스텀 테이블뷰 셀
UITableViewCell 클래스에서 제공하는 표준 스타일 셀을 이용해 이미지와 문자열을 표현하고 글꼴 및 색상 등을 수정할 수 있지만, 기본 형태를 벗어나 다양한 애플리케이션의 요구를 충족시키기 위해 셀을 커스텀 할 수 있다. 셀을 커스텀 하면 이미지를 텍스트 오른쪽에 위치시키는 등 원하는 시각적 형태를 만들 수 있다.
셀을 커스텀 하는 방법에는 크게 두 가지 방법이 있는데, 스토리보드를 이용하거나 코드로 구현할 수 있다.
셀의 콘텐츠뷰에 서브뷰 추가하기
UITableViewCell의 커스텀 서브클래스 만들기
[참고] UITableViewCell의 서브클래스를 이용해 커스텀 이미지뷰를 생성하는 경우, 이미지뷰의 변수명을 imageView로 명명하면 기본 이미지뷰 프로퍼티와 변수명이 같아 원하는 대로 동작하지 않을 수 있으니 반드시 커스텀 이미지뷰의 변수명은 다르게 지어주세요(예. detailImageView, thumbnailImageView, profileImageView). textLabel, detailLabel, accessoryView 등의 기본 프로퍼티 이름 모두 마찬가지입니다.

 지혜의 개발공부로그